Archive for September, 2013

Windows 8.1 had been around some time, some us already had seen the preview or get the hands on RTM version, OEM had grab the final.

And is time to get ready for the launch of Windows 8.1 final version. In October 18th, 2013 Windows 8 customers will have the possibility to update for free in the Windows Store Windows 8 to Windows 8.1.

For the ones who hadn’t seen Windows 8.1 new features in action i had a suggested video for you all:


One of the things about Sharepoint that we should always be aware is updates and evolutions, in this post i will share some information about Sharepoint 2013 updates. And remember test updates always before you install them on your production machine.

New-Update

(image credits to http://www.fifighter.com)

In the following Page you can find every updates launched until now for Sharepoint 2013

http://technet.microsoft.com/en-us/sharepoint/jj891062.aspx

In the following table you can see the different build number’s and the updates and cumulative updates related with that, we will try to keep this table updated.

Version Build # Type Server
Package (KB)
Foundation
Package (KB)
Language
specific
Notes 
Public Beta Preview 15.0.4128.1014 Beta n/a n/a yes Known issues
SPS 2013 RTM 15.0.4420.1017 RTM n/a n/a yes Setup, Install
Dec. 2012 Fix 15.0.4433.1506 update 2752058
2752001
n/a yes Known Issue
March 2013 15.0.4481.1005 PU 2767999 2768000 global New Baseline
April 2013 15.0.4505.1002 CU 2751999 global Known Issue
April 2013 15.0.4505.1005 CU 2726992 global Known Issue
June 2013 15.0.4517.1003 CU 2817346 global Known Issue
June 2013 15.0.4517.1005 CU 2817414 global Known Issue
August 2013 15.0.4535.1000 CU 2817616 2817517 global see KB’s

Long the way there had been released some individual HotFixes

Sharepoint Server:

SharePoint Designer:

I had been doing some experiences of Sharepoint 2013 in the Windows Azure Platform. At this time i am finishing a full powershell script to help to automate this process.

Untitled

But for the experience of build from scratch a Sharepoint 2013 Farm you have around the web a lot of material. Not all references drive you to a well succeeded installation, so i decided to share with you an excellent Technet blog post that in a few steps can lead you to a succeeded installation if you are needing to build a simple farm like  lab or staging environment.

Let’s Get Started!

In this step-by-step guide, you will learn how to:

  • Register a DNS Server in Windows Azure
  • Define a Virtual Network in Windows Azure
  • Configure Windows Server Active Directory in a Windows Azure VM
  • Configure SQL Server 2012 in a Windows Azure VM
  • Configure SharePoint Server 2013 in a Windows Azure VM

Exercise 1: Register a DNS Server in Windows Azure

Register the internal IP address that our domain controller VM will be using for Active Directory-integrated Dynamic DNS services by performing the following steps:

  1. Sign in at the Windows Azure Management Portal with the logon credentials used when you signed up for your Free Windows Azure Trial.
  2. Select Networks located on the side navigation panel on the Windows Azure Management Portal page.
  3. Click the +NEW button located on the bottom navigation bar and select Networks | Virtual Network | Register DNS Server.
  4. Complete the DNS Server fields as follows:- NAME: XXXlabdns01
    – DNS Server IP Address: 10.0.0.4
  5. Click the REGISTER DNS SERVER button.

Exercise 2: Define a Virtual Network in Windows Azure

Define a common virtual network in Windows Azure for running Active Directory, Database and SharePoint virtual machines by performing the following steps:

  1. Sign in at the Windows Azure Management Portal with the logon credentials used when you signed up for your Free Windows Azure Trial.
  2. Select Networks located on the side navigation panel on the Windows Azure Management Portal page.
  3. Click the +NEW button located on the bottom navigation bar and select Networks | Virtual Network | Quick Create.
  4. Complete the Virtual Network fields as follows:- NAME: XXXlabnet01
    – Address Space: 10.—.—.—
    – Maximum VM Count: 4096 [CIDR: /20]
    – Affinity Group: Select the Affinity Group defined in the Getting Started steps from the Prerequisitessection above.
    – Connect to Existing DNS: Select XXXlabdns01 – the DNS Server registered in Exercise 1 above.
  5. Click the CREATE A VIRTUAL NETWORK button.

Exercise 3: Configure Windows Server Active Directory in a Windows Azure VM

Provision a new Windows Azure VM to run a Windows Server Active Directory domain controller in a new Active Directory forest by performing the following steps:

  1. Sign in at the Windows Azure Management Portal with the logon credentials used when you signed up for your Free Windows Azure Trial.
  2. Select Virtual Machines located on the side navigation panel on the Windows Azure Management Portal page.
  3. Click the +NEW button located on the bottom navigation bar and select Compute | Virtual Machines | From Gallery.
  4. In the Virtual Machine Operating System Selection list, select Windows Server 2012 Datacenter and click the Next button.
  5. On the Virtual Machine Configuration page, complete the fields as follows:- Version Release Date: Select the latest version release date to build a new VM with the latest OS updates applied.
    – Virtual Machine Name: XXXlabad01
    – New User Name: Choose a secure local Administrator user account to provision.
    – New Password and Confirm Password fields: Choose and confirm a new local Administrator password.
    – Size: Small (1 core, 1.75GB Memory)

    Click the Next button to continue.

    Note: It is suggested to use secure passwords for Administrator users and service accounts, as Windows Azure virtual machines could be accessible from the Internet knowing just their DNS.  You can also read this document on the Microsoft Security website that will help you select a secure password:http://www.microsoft.com/security/online-privacy/passwords-create.aspx.

  6. On the Virtual Machine Mode page, complete the fields as follows:- Standalone Virtual Machine: Selected
    – DNS Name: XXXlabad01.cloudapp.net
    – Storage Account: Select the Storage Account defined in the Getting Started steps from thePrerequisites section above.
    – Region/Affinity Group/Virtual Network: Select XXXlabnet01 – the Virtual Network defined inExercise 2 above.
    – Virtual Network Subnets: Select Subnet-1 (10.0.0.0/23)

    Click the Next button to continue.

  7. On the Virtual Machine Options page, click the Checkmark button to begin provisioning the new virtual machine.As the new virtual machine is being provisioned, you will see the Status column on the Virtual Machines page of the Windows Azure Management Portal cycle through several values includingStopped, Stopped (Provisioning), and Running (Provisioning).  When provisioning for this new Virtual Machine is completed, the Status column will display a value of Running and you may continue with the next step in this guide.
  8. After the new virtual machine has finished provisioning, click on the name ( XXXlabad01 ) of the new Virtual Machine displayed on the Virtual Machines page of the Windows Azure Management Portal.
  9. On the virtual machine Dashboard page for XXXlabad01, make note of the Internal IP Addressdisplayed on this page located on the right-side of the page.  This IP address should be listed as10.0.0.4.If a different internal IP address is displayed, the virtual network and/or virtual machine configuration was not completed correctly.  In this case, click the DELETE button located on the bottom toolbar of the virtual machine details page for XXXlabad01, and go back to Exercise 2 and Exercise 3 to confirm that all steps were completed correctly.
  10. On the virtual machine Dashboard page for XXXlabad01, click the Attach button located on the bottom navigation toolbar and select Attach Empty Disk.  Complete the following fields on the Attach an empty disk to the virtual machine form:- Name: XXXlabad01-data01
    – Size: 10 GB
    – Host Cache Preference: None

    Click the Checkmark button to create and attach the a new virtual hard disk to virtual machine XXXlabad01.

  11. On the virtual machine Dashboard page for XXXlabad01, click the Connect button located on the bottom navigation toolbar and click the Open button to launch a Remote Desktop Connection to the console of this virtual machine.  Logon at the console of your virtual machine with the local Administrator credentials defined in Step 5 above.
  12. From the Remote Desktop console of XXXlabad01, create a new partition on the additional data disk attached above in Step 10 and format this partition as a new F: NTFS volume.  This volume will be used for NTDS DIT database, log and SYSVOL folder locations.If you need additional guidance to complete this step, feel free to leverage the following study guide for assistance: Windows Server 2012 “Early Experts” Challenge – Configure Local Storage
  13. Using the Server Manager tool, install Active Directory Domain Services and promote this server to a domain controller in a new forest with the following parameters:- Active Directory Forest name: contoso.com
    – Volume Location for NTDS database, log and SYSVOL folders: F:

    If you need additional guidance to complete this step, feel free to leverage the following study guide for assistance: Windows Server 2012 “Early Experts” Challenge – Install and Administer Active Directory

  14. After Active Directory has been installed, create the following user accounts that will be used when installing and configuring SharePoint Server 2013 later in this step-by-step guide:- CONTOSO\sp_farm – SharePoint Farm Data Access Account
     CONTOSO\sp_serviceapps – SharePoint Farm Service Applications Account

    If you need additional guidance to complete this step, feel free to leverage the following study guide for assistance: Windows Server 2012 “Early Experts” Challenge – Install and Administer Active Directory

The configuration for this virtual machine is now complete, and you may continue with the next exercise in this step-by-step guide.

Exercise 4: Configure SQL Server 2012 in a Windows Azure VM

Provision a new Windows Azure VM to run SQL Server 2012 by performing the following steps:

  1. Sign in at the Windows Azure Management Portal with the logon credentials used when you signed up for your Free Windows Azure Trial.
  2. Select Virtual Machines located on the side navigation panel on the Windows Azure Management Portal page.
  3. Click the +NEW button located on the bottom navigation bar and select Compute | Virtual Machines | From Gallery.
  4. In the Virtual Machine Operating System Selection list, select SQL Server 2012 SP1 Enterprise and click the Next button.
  5. On the Virtual Machine Configuration page, complete the fields as follows:- Virtual Machine Name: XXXlabdb01
    – New User Name: Choose a secure local Administrator user account to provision.
    – New Password and Confirm Password fields: Choose and confirm a new local Administrator password.
    – Size: Medium (2 cores, 3.5GB Memory)

    Click the Next button to continue.

  6. On the Virtual Machine Mode page, complete the fields as follows:- Standalone Virtual Machine: Selected
    – DNS Name: XXXlabdb01.cloudapp.net
    – Storage Account: Select the Storage Account defined in the Getting Started steps from thePrerequisites section above.
    – Region/Affinity Group/Virtual Network: Select XXXlabnet01 – the Virtual Network defined inExercise 2 above.
    – Virtual Network Subnets: Select Subnet-1 (10.0.0.0/23)

    Click the Next button to continue.

  7. On the Virtual Machine Options page, click the Checkmark button to begin provisioning the new virtual machine.As the new virtual machine is being provisioned, you will see the Status column on the Virtual Machines page of the Windows Azure Management Portal cycle through several values includingStopped, Stopped (Provisioning), and Running (Provisioning).  When provisioning for this new Virtual Machine is completed, the Status column will display a value of Running and you may continue with the next step in this guide.
  8. After the new virtual machine has finished provisioning, click on the name ( XXXlabdb01 ) of the new Virtual Machine displayed on the Virtual Machines page of the Windows Azure Management Portal.
  9. On the virtual machine Dashboard page for XXXlabdb01, make note of the Internal IP Addressdisplayed on this page.  This IP address should be listed as 10.0.0.5.If a different internal IP address is displayed, the virtual network and/or virtual machine configuration was not completed correctly.  In this case, click the DELETE button located on the bottom toolbar of the virtual machine details page for XXXlabdb01, and go back to Exercise 2 and Exercise 3 to confirm that all steps were completed correctly.
  10. On the virtual machine Dashboard page for XXXlabdb01, click the Attach button located on the bottom navigation toolbar and select Attach Empty Disk.  Complete the following fields on the Attach an empty disk to the virtual machine form:- Name: XXXlabdb01-data01
    – Size: 50 GB
    – Host Cache Preference: None

    Click the Checkmark button to create and attach the a new virtual hard disk to virtual machine XXXlabdb01.

  11. On the virtual machine Dashboard page for XXXlabdb01, click the Connect button located on the bottom navigation toolbar and click the Open button to launch a Remote Desktop Connection to the console of this virtual machine.  Logon at the console of your virtual machine with the local Administrator credentials defined in Step 5 above.
  12. From the Remote Desktop console of XXXlabdb01, create a new partition on the additional data disk attached above in Step 10 and format this partition as a new F: NTFS volume. After formatting this new volume, create the following folders:
    1. Create F:\MSSQL folder
    2. Create F:\MSSQL\DATA folder
    3. Create F:\MSSQL\LOGS folder
    4. Create F:\MSSQL\BACKUP folder
  13. Open SQL Server Management Studio from Start | All Programs | Microsoft SQL Server 2012 | SQL Server Management Studio and update default folder locations to the F: volume.
    1. Connect to the SQL Server 2012 default instance using your Windows Account.
    2. Now, you will update the database’s default locations for DATA, LOGS and BACKUP folders. To do this, right click on your SQL Server instance and select Properties.
    3. Select Database Settings from the left side pane.
    4. Locate the Database default locations section and update the default values for each path to point to the new folder paths defined above in Step 12.
    5. Close SQL Server Management Studio.
  14. In order to allow SharePoint to connect to the SQL Server, you will need to add an Inbound Rule for the SQL Server requests in the Windows Firewall. To do this, open Windows Firewall with Advanced Security from Start | All Programs | Administrative Tools.
    1. Select Inbound Rules node, right-click it and select New Rule to open the New Inbound Rule Wizard.
    2. In the Rule Type page, select Port and click Next.
    3. In Protocols and Ports page, leave TCP selected, select Specific local ports, and set its value to1433. Click Next to continue.
    4. In the Action page, make sure that Allow the connection is selected and click Next.
    5. In the Profile page, leave the default values and click Next.
    6. In the Name page, set the Inbound Rule’s Name to SQLServerRule and click Finish
    7. Close Windows Firewall with Advanced Security window.
  15. Using the Server Manager tool, join this server to the contoso.com domain and restart the server to complete the domain join operation.
  16. After the server restarts, connect again via Remote Desktop to the server’s console and login with the local Administrator credentials defined above in Step 5.
  17. Open SQL Server Management Studio from Start | All Programs | Microsoft SQL Server 2012 | SQL Server Management Studio and add the CONTOSO\Administrator user to SQL Server with the Sysadmin server role selected.
    1. Expand Security folder within the SQL Server instance. Right-click Logins folder and select New Login.
    2. In the General section, set the Login name to CONTOSO\Administrator, and select theWindows Authentication option.
    3. Click Server Roles on the left pane.  Select the checkbox for the Sysadmin server role.
    4. Click the OK button and close SQL Server Management Studio.

The configuration for this virtual machine is now complete, and you may continue with the next exercise in this step-by-step guide.

Exercise 5: Configure SharePoint Server 2013 in a Windows Azure VM

Provision a new Windows Azure VM to run SharePoint Server 2013 by performing the following steps:

  1. Sign in at the Windows Azure Management Portal with the logon credentials used when you signed up for your Free Windows Azure Trial.
  2. Select Virtual Machines located on the side navigation panel on the Windows Azure Management Portal page.
  3. Click the +NEW button located on the bottom navigation bar and select Compute | Virtual Machines | From Gallery.
  4. In the Virtual Machine Operating System Selection list, select SharePoint Server 2013 Trial and click the Next button.
  5. On the Virtual Machine Configuration page, complete the fields as follows:- Virtual Machine Name: XXXlabapp01
    – New User Name: Choose a secure local Administrator user account to provision.
    – New Password and Confirm Password fields: Choose and confirm a new local Administrator password.
    – Size: Large (4 cores, 7GB Memory)

    Click the Next button to continue.

  6. On the Virtual Machine Mode page, complete the fields as follows:- Standalone Virtual Machine: Selected
    – DNS Name: XXXlabapp01.cloudapp.net
    – Storage Account: Select the Storage Account defined in the Getting Started steps from thePrerequisites section above.
    – Region/Affinity Group/Virtual Network: Select XXXlabnet01 – the Virtual Network defined inExercise 2 above.
    – Virtual Network Subnets: Select Subnet-1 (10.0.0.0/23)

    Click the Next button to continue.

  7. On the Virtual Machine Options page, click the Checkmark button to begin provisioning the new virtual machine.As the new virtual machine is being provisioned, you will see the Status column on the Virtual Machines page of the Windows Azure Management Portal cycle through several values includingStopped, Stopped (Provisioning), and Running (Provisioning).  When provisioning for this new Virtual Machine is completed, the Status column will display a value of Running and you may continue with the next step in this guide.
  8. After the new virtual machine has finished provisioning, click on the name ( XXXlabapp01 ) of the new Virtual Machine displayed on the Virtual Machines page of the Windows Azure Management Portal.
  9. On the virtual machine Dashboard page for XXXlabapp01, make note of the Internal IP Addressdisplayed on this page.  This IP address should be listed as 10.0.0.6.If a different internal IP address is displayed, the virtual network and/or virtual machine configuration was not completed correctly.  In this case, click the DELETE button located on the bottom toolbar of the virtual machine details page for XXXlabapp01, and go back to Exercise 2,  Exercise 3 and Exercise 4 to confirm that all steps were completed correctly.
  10. On the virtual machine Dashboard page for XXXlabapp01, click the Connect button located on the bottom navigation toolbar and click the Open button to launch a Remote Desktop Connection to the console of this virtual machine.  Logon at the console of your virtual machine with the local Administrator credentials defined in Step 5 above.
  11. In the Server Manager tool, click on Local Server in the left navigation pane and click on theWorkgroup option.  Join this server to the contoso.com domain and restart the server to complete the domain join operation.
  12. After the server restarts, re-establish a Remote Desktop connection to the server and logon with theCONTOSO\Administrator domain user credentials defined earlier in Exercise 3.
  13. In the Server Manager tool, click on Local Server in the left navigation pane and select IE Enhanced Security Configuration.  Turn off enhanced security for Administrators and click the OK button.Note: Modifying Internet Explorer Enhanced Security configurations is not good practice for production environments and is only for the purpose of this particular step-by-step lab guide.
  14. On the Desktop, double-click on the SharePoint 2013 Products Configuration Wizard shortcut to launch the configuration wizard.  Click the Next button to continue. If prompted to start or reset services, click the Yes button.
  15. In the SharePoint Products Configuration Wizard, when prompted on the Connect to server farm dialog, select the option to Create a new server farm.
  16. On the Specify Configuration Database Settings, specify the following values for each field:- Database Server: XXXlabdb01
    – Username: CONTOSO\sp_farm
    – Password: Type the password specified when the sp_farm domain user account was created earlier inExercise 3, Step 14.
  17. Click the Next > button and accept all other default values in the SharePoint Products Configuration Wizard.  Click the Finish button when prompted to complete the wizard.
  18. The SharePoint 2013 Central Administration web page should launch automatically.  When prompted, click the Start the Wizard button to begin the Initial Farm Configuration Wizard.
  19. When prompted for Service Account, type the CONTOSO\sp_serviceapps domain username and password specified when this account was created earlier in Exercise 3, Step 14.
  20. Accept all other default values and click the Next > button to continue.
  21. On the Create a Site Collection page, create a new top-level Intranet site collection using the following field values:- Title and Description: Enter your preferred Title and Description for the new site collection
    – URL: Select the root URL path – http://XXXlabapp01/
    – Select experience version: 
    2013
    – Select a template: Publishing | Publishing Portal

    Click the OK button to provision a new top-level Intranet site collection.

    After the new top-level Intranet site collection is provisioned, test navigating to the URL for this site collection from within the Remote Desktop session to the server.

  22. On the SharePoint 2013 Central Administration site, configure a Public URL alternate access mapping for accessing the new top-level Intranet site collection from the Internet.
    1. On the Central Administration site home page, click the Configure alternate access mappingslink.
    2. On the Alternate Access Mappings page, click the Edit Public URLs link.
    3. On the Edit Public Zone URLs page, select and specify the following values:- Alternate Access Mapping Collection: SharePoint – 80
       Internet: http://XXXlabapp01.cloudapp.net

      Click the Save button to complete the Alternate Access Mapping configuration.

  23. Close the Remote Desktop session to the server.
  24. Sign in at the Windows Azure Management Portal with the logon credentials used when you signed up for your Free Windows Azure Trial.
  25. Select Virtual Machines located on the side navigation panel on the Windows Azure Management Portal page.
  26. On the Virtual Machines page, click on the name of the SharePoint virtual machine – XXXlabapp01.
  27. On the XXXlabapp01 virtual machine details page, click on Endpoints in the top navigation area of the page.
  28. Click the +Add Endpoint button in the bottom navigation bar of the page to define a new virtual machine endpoint that will permit HTTP web traffic inbound to the SharePoint virtual machine.
  29. On the Add an endpoint to a virtual machine form, select the Add Endpoint option and click the Nextbutton to continue.
  30. On the Specify the details of the endpoint form, specify the following field values:- Name: WebHTTP
    – Protocol: TCP
    – Public Port: 80
    – Private Port: 80

    Click the Checkmark button to create a new endpoint definition that will permit inbound web traffic to the SharePoint virtual machine.

  31. After the endpoint configuration has been successfully applied, test browsing to the following public URL to confirm that you are able to access the Intranet site collection that is configured on SharePoint:- URL: http://XXXlabapp01.cloudapp.net

The configuration for this virtual machine is now complete, and you may continue with the next exercise in this step-by-step guide. Be sure to shutdown your lab VMs from the Windows Azure Management Portal when not in use to save on compute charges.

Original post at http://blogs.technet.com/b/keithmayer/archive/2013/07/15/step-by-step-build-a-free-sharepoint-2013-lab-in-the-cloud-with-windows-azure-31-days-of-servers-in-the-cloud-part-7-of-31.aspx#.Ukgoo4afjSw.

One of the problems related with Mobile development is the need of devices for testing, is impossible to have all the devices needed to make our test’s.

perfecto

At some time i had look for a solution that can help the mobile solutions test. Last 2 weeks i had try a interesting platform, his name is Perfecto Mobile and is a sas service that can really help to automate our app testing and also to have remote access to a great number of devices.


This platform was a really nice suprise, not just for the base features i was looking for but also because this sas system has some integration with code repositories like TFS. A nice way to go if testing and give support to a great variety of devices is one off your drives.


Content is king

Posted: September 25, 2013 in Anouncements

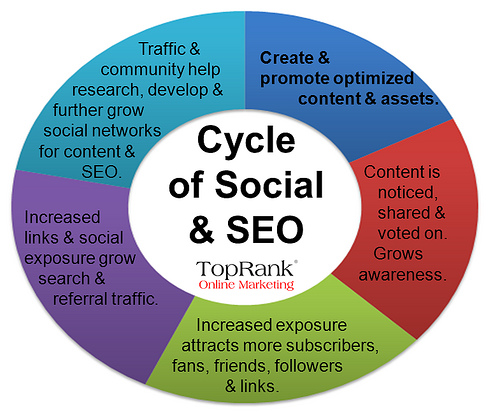
I had read today a post from easyboyweb that is according my ideas about the content and his importance in our Work in the digital being us Business consultants technological thinker’s, Technical decision maker’s or just technical professionals (like architects or developer’s), so idecided to bring this content to our discussion forum and to our readers.

All credits go the the author’s of the post.
 

Untitled

Is it True that Content is King?


Let’s face it; a business is dead in the water without sales. To have sales you must have a strategy in place that drives traffic to your website. Once there, that traffic has to convert to sales. Like many people, you’ve probably heard that content is king. However, with Goggle’s algorithm changes is this still true? Google’s changes wiped out millions of websites that had so called ‘web content’ so is content still important.

Content vs. Bullsh*t

To understand why Google crushed those sites you have to understand that what used to work doesn’t work now. Back in the day, all you had to do was set up a website with a bunch of bullsh*t as long as it had the keywords that you were targeting and you ranked high in the search engines. Naturally, Google caught wind of this but really didn’t have anything in place to prevent it—until recently. With Google’s changes, it is not enough to say content is king but that ‘quality’ content is king.

What is Quality Content?

The answer to this question might seem obvious but it may be worth answering to make sure the answer is clear. Quality content means well-written content without grammatical errors that serves some benefit to your reader.  Content can take many forms, written, video and audio but it has to make sense and be produced with the intent to benefit your audience and to build a relationship.

You don’t have to be a great writer to provide quality content. You just have to produce it with the benefits of your audience in mind and not your pockets. This isn’t to say that it doesn’t require any particular skill to write quality content because it does; however, with the right amount of desire you can learn what’s necessary to produce quality content. If all else fails, you can outsource this task to a freelancer.

Fresh Content

With the changes made to Google’s algorithm, it is now equally as important that you ensure that your website has fresh, quality content. Fresh content means that you update the site regularly with content that your target audience finds helpful. Providing fresh, quality content gives people a reason to link to your site, which produces natural links. Natural links are what Google uses to determine if your content is high quality.

Aren’t Back Links Enough?

Back links used to be enough to rank you higher in the search engine. Google used to use these back links as a form of endorsement. It didn’t matter from where these links came, which meant people were doing some shady stuff to achieve back links.  Like with like bullsh*t content, Google caught on and now links have to be natural links. The more natural links your site has the better your rank is in the search engines. These links need to come from more than one type of source and a big part of that is social media.

If you’ve found this information useful, learning how to provide fresh, high quality content if you’re not a writer might be of interest.

” original post @ easyboyweb

Today i was at the Microsoft Portugal Event talking about the development for Windows Store APPs on Windows 8.1 using HTML.

I was very lucky with my audience a lot of WebDeveloper’s curious of how they can take the knowldge they have and recycle that KB to become Windows Store APPs developer’s.

The other part of the audience was .NET developer’s who had just love the intelisence and javascript debug capabilities.

Funny that the few persons who already knew the HTML Windows Store APPS had their eyes blinking when i dive in to the details of how HTML is processed and what are the HTML  Windows store Apps behavior.

Is very grateful when a trainer feels that after a training session my audience had really learned something, i sure had learn a lot with them.

You can see the slides of my demo at


UntitledI was invited by Microsoft to speak at the Tech Refresh event, to speak about HTML app Windows 8.1 APP store development.


I will speak about the HTML Windows 8 development model to who never heard about and the what’s new in Windows 8.1.

Once more is a great pleasure to be in stage talking about a so nice OS and his fantastic development model, i will post here all the resources i created for this presentation.

For the ones who will be at the event i hope i can give you some useful information and as always, i wil be waiting for your apps ;).

See you there.

To know more about the event go to:

https://msevents.microsoft.com/CUI/EventDetail.aspx?EventID=1032564008&Culture=en-us&community=0


Sem TítuloLast Friday i had the pleasure to speak in na event dedicated to the developer’s of Fidelidade. Fidelidade is one of the major security brands in Portugal and had made last fridaya event dedicated to their IT Business managers and developer’s with a great focus on development and technology.


I was very happy to see that a big company like Fidelidade made a event entire dedicated to the people like us who put the hands on conde to do magic. My presentation was aboit Mobile technologies and the actual market and development status quo.


A presententation to explain the kernel of the major mobile OS (IOS, Android, Windows ) Trends and best pratices about apps and mobile development we also had take a look about the choices a developer should made before implemente na APP and what are the lternetives we have to build no native apps using frameworks.

If you want to take a look at the slides used in this presentation go to: http://www.slideshare.net/amarreiros/pragmatic-mobile-apps-choices-frameworks-and-dev

If you want to know more about fidelidade go to their site: http://www.fidelidade.pt/


As you know i had made a presentation (in Portuguese) at the .netponto community last month (you can know more about that at https://digitalmindignition.wordpress.com/2013/07/29/40a-meting-of-netponto-pt-community/).


Some weeks ago the community had release the vídeo  of this presentation. So if you hadn’t the oportunity to be at this presentation and you are curious about Windows 8.1 and if you understand Portuguese take a look at the following link:  http://www.youtube.com/watch?v=e1uw5rOkCC0

back to business

Posted: September 15, 2013 in Anouncements

http://www.flickr.com/photos/bordons/4130822741/


was almost two weeks of sun sea and some sports and Reading. I must confess i was really needing this kb and mind recycle and a full mind reboot.

Now is time to go back to work,we have a lot of new projects to bring on a lot of kb and tips to share learn and teatch, put your engines on this will be a hell of a year for the technical knowldge digers and ninjas.


Restarting engines